Burn iPad Recorded Video Clips with Windows DVD Maker
Did you shoot a group of video clips using your iPad and now you want to make a DVD slide show of them to keep the best memories forever? This can be easily accomplished if Windows DVD Maker is pre-installed onto your computer. The process is quite easy:
- Transfer video clips from iPad to PC
- Convert iPad video (.mov)
- Burn iPad video to DVD with Windows DVD Maker
What you will need:
- Wireless Transfer App for iPad (Optional)
- Video Converter App (Free)
- Windows DVD Maker (Free)
Transfer video clips from iPad to PC
To transfer video clips from iPad to PC, you just connect your iPad with PC via cable. Go to Computer and open the iPad folder. There you can find the video clips shot with your iPad and then copy and paste them to your local hard drive.
Optionally, you can use Wireless Transfer App to help you get your iPad video clips transferred to your PC.

Convert iPad video (.mov)
The iPad videos transferred to your PC are in .mov format and thus cannot be directly imported into Windows DVD Maker project. You will need to convert the videos from mov to avi, mpg, wmv or other Windows formats first. Free Video Converter App is a great tool to convert .mov to Windows DVD Maker supported format.
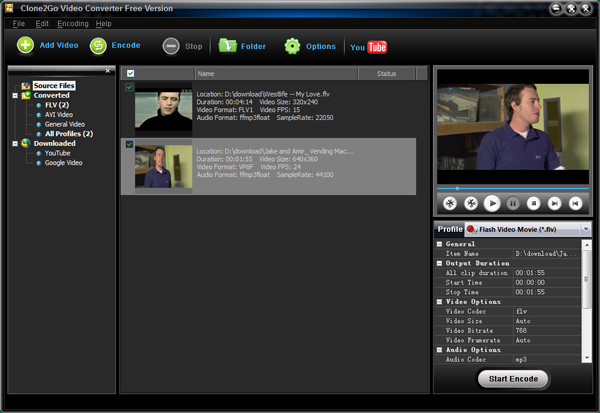
1. Click the Add Video button to import your iPhone videos.
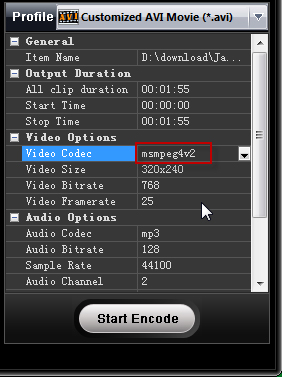
2. From the Profile drop-down list, choose Customized AVI Movie (*.avi) as the output format.
Note: You need to set the “video codec” to “msmpeg4v2″ in order to get the converted avi files successfully imported into Windows DVD Maker.
3. Click the “Start Encode” button to start to convert iPad video to AVI.
Burn iPad video to DVD with Windows DVD Maker
After your iPad video files are converted into AVI video, you can launch Windows DVD Maker and import the avi files into Windows DVD Maker for burning to DVD.
Done.